Instalasi Debian Lenny 5.04 (Terbaru)
1. Installer Boot Menu : Install
2. Choose Language : English
3. Choose Country : Other
4. Choose Region : Asia
5. Choose Country : Indonesia
6. Keymap to Use : American English
7. Scaning CD-ROM
8. Primary Network Ineterface : eth0
9. Configure The Network with DHCP : Cancel
10. Network Autoconfiguration Failed : Continue
11.Network Configuration Method : Configure network manually
12. IP Address : 192.168.1.1
13. Netmask : 255.255.255.192
14. Gateway : 192.168.1.62
15. Name Server Address : 192.168.1.62
16. Hostname : antoro
17, Domain Name : situstkj.co.cc
18. Setting up the clock : Jakarta
19. Partition Method : Guided Use Entire Disk
20. Select Disk to Partition : (Merk Harddisk Anda)
21. Finish and write changes to disk.
22. Write Changes to Disk : Yes
23. Partition Formating
24. Installing Base System
25. Root Password : antadm
26. Re-enter Passwod : antadm
27. Full Name for User : Teknik Komputer dan Jaringan
28. Username For Account : tkj
29. Choose Password : situstkj
30. Re-enter password : situstkj
31. Configuring apt
32. Scan another CD or DVD : No
33. Use a Network Mirror : No
34. Lanjutan Configuring apt
35. Participate In the package : No
36. Choose Software : Standard System (only)
37. Install Software
38. Install Group boot loader : Yes
39. Finish Instalation
40. Login
Username : root
Password : antadm
|
* Kata2 yang bercetak tebal adalah perintah yang dijalankan pada komputer server.
* Kata2 yang berwarna merah adalah yang harus anda ubah atau buat.
1) pico /etc/network/interfaces
# The primary network interface
allow-hotplug eth0
iface eth0 inet static
address 192.168.1.1
netmask 255.255.255.192
network 192.168.1.0
broadcast 192.168.1.63
gateway 192.168.1.62
# dns-* options are implemented by the resolvconf package, if installed
dns-nameservers 192.168.1.62
dns-search situstkj.co.cc
# The secondary network interface
auto eth1
iface eth1 inet static
address 172.16.1.62
netmask 255.255.255.192
network 72.16.1.0
broadcast 172.16.1.63
2) /etc/init.d/networking restart
3) pico /etc/sysctl.conf
# Uncomment the next line to enable packet forwarding for IPv4
net.ipv4.ip_forward=1
4) iptables -t nat -A POSTROUTING -o eth0 -j MASQUERADE
5) iptables -t nat -n –L
Chain PREROUTING (policy ACCEPT)
target prot opt source destination
Chain POSTROUTING (policy ACCEPT)
target prot opt source destination
MASQUERADE all -- 0.0.0.0/0 0.0.0.0/0
Chain OUTPUT (policy ACCEPT)
target prot opt source destination
6) iptables-save > /etc/network/iptables.conf
7) echo "iptables-restore < /etc/network/iptables.conf" >> /etc/network/if-up.d/iptables"
8) pico /etc/network/if-up.d/iptables
#!/bin/sh iptables-restore < /etc/network/iptables.conf
9) chmod +x /etc/network/if-up.d/iptables
10) reboot
11) ifconfig | less
eth0 Link encap:Ethernet HWaddr 00:0c:29:32:97:44
inet addr:192.168.1.1 Bcast:192.168.1.63 Mask:255.255.255.192
inet6 addr: fe80::20c:29ff:fe32:9744/64 Scope:Link
UP BROADCAST RUNNING MULTICAST MTU:1500 Metric:1
RX packets:5 errors:0 dropped:0 overruns:0 frame:0
TX packets:82 errors:0 dropped:0 overruns:0 carrier:0
collisions:0 txqueuelen:1000
RX bytes:400 (400.0 B) TX bytes:3660 (3.5 KiB)
Interrupt:19 Base address:0x2000
eth1 Link encap:Ethernet HWaddr 00:0c:29:32:97:4e
inet addr:172.16.1.62 Bcast:172.16.1.63 Mask:255.255.255.192
inet6 addr: fe80::20c:29ff:fe32:974e/64 Scope:Link
UP BROADCAST RUNNING MULTICAST MTU:1500 Metric:1
RX packets:148 errors:0 dropped:0 overruns:0 frame:0
TX packets:100 errors:0 dropped:0 overruns:0 carrier:0
collisions:0 txqueuelen:1000
RX bytes:12617 (12.3 KiB) TX bytes:9610 (9.3 KiB)
Interrupt:16 Base address:0x2080
lo Link encap:Local Loopback
inet addr:127.0.0.1 Mask:255.0.0.0
inet6 addr: ::1/128 Scope:Host
12) iptables -t nat -n –L
Chain PREROUTING (policy ACCEPT)
target prot opt source destination
Chain POSTROUTING (policy ACCEPT)
target prot opt source destination
MASQUERADE all -- 0.0.0.0/0 0.0.0.0/0
Chain OUTPUT (policy ACCEPT)
target prot opt source destination
(Jika terdapat kata Masquerade all berarti konfigurasi Anda Sudah Berhasil)
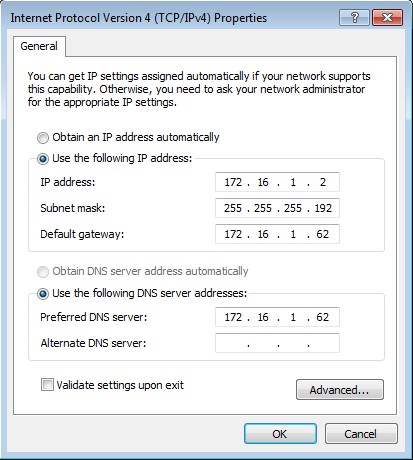
13) Kita check koneksinya. Pada windows ubah Settingan TCP/IP Menjadi Seperti ini:
IP Address : 172.16.1.2
Subnet Mask : 255.255.255.192
Default Gateway : 172.16.1.62
Preferred DNS Server : 172.16.1.62
14) Setelah settingan diubah, Bukalah Command Prompt computer client dan cek koneksi ke server.
C:\Users\antoro>ping 172.16.1.62
Pinging 172.16.1.62 with 32 bytes of data:
Reply from 172.16.1.62: bytes=32 time<1ms TTL=64
Reply from 172.16.1.62: bytes=32 time<1ms TTL=64
Reply from 172.16.1.62: bytes=32 time<1ms TTL=64
Reply from 172.16.1.62: bytes=32 time=1ms TTL=64
Ping statistics for 172.16.1.62:
Packets: Sent = 4, Received = 4, Lost = 0 (0% loss),
Approximate round trip times in milli-seconds:
Minimum = 0ms, Maximum = 1ms, Average = 0ms
C:\Users\antoro>ping 192.168.1.1
Pinging 192.168.1.1 with 32 bytes of data:
Reply from 192.168.1.1: bytes=32 time=1ms TTL=64
Reply from 192.168.1.1: bytes=32 time<1ms TTL=64
Reply from 192.168.1.1: bytes=32 time<1ms TTL=64
Reply from 192.168.1.1: bytes=32 time<1ms TTL=64
Ping statistics for 192.168.1.1:
Packets: Sent = 4, Received = 4, Lost = 0 (0% loss),
Approximate round trip times in milli-seconds:
Minimum = 0ms, Maximum = 1ms, Average = 0ms
15) Jika Reply, Maka konfurasi router anda bisa dikatakan berhasil. |
Setelah berhasil
mengkonfigurasi Router Selanjutnya kita akan mengkonfigurasi DNS Server. pada setting kali ini anda harus teliti salah satu karakter saja maka konfigurasi tidak akan berjalan. Silahkan ikuti langkah berikut:
* Kata2 yang
bercetak tebal adalah perintah yang dijalankan pada komputer server.
* Kata2 yang
berwarna merah adalah yang harus anda ubah atau buat.
1)
apt-get install bind9
2)
cd /etc/bind
3)
pico named.conf.local
zone "situstkj.co.cc" {
type master;
file "/etc/bind/db.situstkj";
};
zone "sub.situstkj.co.cc" {
type master;
file "/etc/bind/db.sub";
};
zone "1.16.172.in-addr.arpa" {
type master;
file "/etc/bind/db.172";
};
4) pico named.conf.options
options {
directory "/var/cache/bind";
forwarders {
192.168.1.62;
};
allow-query { any; };
auth-nxdomain no; # conform to RFC1035
listen-on-v6 { any; };
};
* Jangan ubah/hapus baris yang lain.
5) cp db.local db.situstkj
6) cp db.local db.sub
7) cp db.127 db.172
8) pico db.situstkj
;
; BIND data file for local loopback interface
;
$TTL 604800
@ IN SOA antoro.situstkj.co.cc. antoro.situstkj.co.cc. (
2 ; Serial
604800 ; Refresh
86400 ; Retry
2419200 ; Expire
604800 ) ; Negative Cache TTL
;
@ IN NS antoro.situstkj.co.cc.
@ IN MX 10 mail.situstkj.co.cc.
@ IN A 172.16.1.62
antoro IN A 172.16.1.62
www IN CNAME antoro
mail IN CNAME antoro
9) pico db.sub
;
; BIND data file for local loopback interface
;
$TTL 604800
@ IN SOA sub.situstkj.co.cc. sub.situstkj.co.cc. (
2 ; Serial
604800 ; Refresh
86400 ; Retry
2419200 ; Expire
604800 ) ; Negative Cache TTL
;
@ IN NS sub.situstkj.co.cc.
@ IN A 172.16.1.62
sub IN A 172.16.1.62
www IN CNAME sub
10) pico db.172
; BIND reverse data file for local loopback interface
;
$TTL 604800
@ IN SOA antoro.situstkj.co.cc. antoro.situstkj.co.cc. (
1 ; Serial
604800 ; Refresh
86400 ; Retry
2419200 ; Expire
604800 ) ; Negative Cache TTL
;
@ IN NS antoro.situstkj.co.cc.
62 IN PTR antoro.situstkj.co.cc.
* 62 berasal dari : 172.16.1.62
11) pico /etc/resolv.conf
search situstkj.co.cc
nameserver 127.0.0.1
nameserver 172.16.1.62
nameserver 192.168.1.62
12) /etc/init.d/bind9 restart
Stopping domain name service...: bind9.
Starting domain name service.....: bind9.
13) Sekarang kita check DNS Server kita melalui windows, masuk CMD dan ketikkan :
C:\Users\antoro>nslookup situstkj.co.cc
Server: antoro.situstkj.co.cc
Address: 172.16.1.62
Name: situstkj.co.cc
Address: 172.16.1.62
C:\Users\antoro>nslookup antoro.situstkj.co.cc
Server: antoro.situstkj.co.cc
Address: 172.16.1.62
Name: antoro.situstkj.co.cc
Address: 172.16.1.62
C:\Users\antoro>nslookup mail.situstkj.co.cc
Server: antoro.situstkj.co.cc
Address: 172.16.1.62
Name: antoro.situstkj.co.cc
Address: 172.16.1.62
Aliases: mail.situstkj.co.cc
C:\Users\antoro>nslookup www.situstkj.co.cc
Server: antoro.situstkj.co.cc
Address: 172.16.1.62
Name: antoro.situstkj.co.cc
Address: 172.16.1.62
Aliases: www.situstkj.co.cc
C:\Users\antoro>nslookup sub.situstkj.co.cc
Server: antoro.situstkj.co.cc
Address: 172.16.1.62
Name: sub.situstkj.co.cc
Address: 172.16.1.62
Jika tampil tulisan berikut. Berarti konfigurasi Domain Name Service / DNS Server sudah berhasil.
|
Setelah berhasil
Mengkonfigurasi DNS Server Selanjutnya kita akan mengkonfigurasi Web Server. Pada setting kali ini akan sangat mudah, karna hanya membutuhkan beberapa langkah saja. Silahkan ikuti langkah berikut:
* Kata2 yang bercetak tebal adalah perintah yang dijalankan pada komputer server.
* Kata2 yang berwarna merah adalah yang harus anda ubah atau buat.
1) apt-get install apache2 php5
2) pico /etc/apache2/sites-available/default (Tambahkan pada baris terakhir)
<VirtualHost *:80>
ServerAdmin antoro@situstkj.co.cc
ServerName www.situstkj.co.cc
ServerAlias situstkj.co.cc
DocumentRoot /var/www/
</VirtualHost>
3) /etc/init.d/apache2 restart
Restarting web server: apache2 ... waiting .
4) pico /var/www/index.html
<html><body><h1>www.situsTKJ.co.cc berhasil</h1></body></html>
5) Buka browser komputer client dan masukkan url www.situstkj.co.cc anda akan melihat tampilan ini:
|
Setelah berhasil Mengkonfigurasi
Web Server Selanjutnya kita akan mengkonfigurasi Webmail Server. Pada setting kali ini akan sangat memerlukan ketelitian. Silahkan ikuti langkah berikut:
* Kata2 yang
bercetak tebal adalah perintah yang dijalankan pada komputer server.
* Kata2 yang
berwarna merah adalah yang harus anda ubah atau buat.
1)
apt-get install postfix squirrelmail courier-imap courier-pop
Create directories for web-based administration : NO
Local only : OK
General type of mail configuration : Internet Site
System mail name : situstkj.co.cc
2)
pico /etc/apache2/apache2.conf
# Include the virtual host configurations:
Include /etc/apache2/sites-enabled/
Include /etc/squirrelmail/apache.conf
3) pico /etc/squirrelmail/apache.conf
# users will prefer a simple URL like http://webmail.example.com
#<virtualhost 1.2.3.4>
# DocumentRoot /usr/share/squirrelmail
# ServerName webmail.example.com
#</virtualhost>
<virtualhost *:80> DocumentRoot /usr/share/squirrelmail ServerName mail.situstkj.co.cc </virtualhost>
* Jangan ubah / hapus baris yang lainnya.
4) /etc/init.d/apache2 restart
Restarting web server: apache2 ... waiting .
5) Buka browser komputer client dan masukkan url mail.situstkj.co.cc anda akan melihat tampilan ini:

6) maildirmake /etc/skel/Maildir
7) adduser antok
8) adduser anisa
9) dpkg-reconfigure postfix
Local only : OK
General type of mail configuration : Internet Site
System mail name : situstkj.co.cc
Root and postmaster mail recipient : (kosongkan)
Other destinations to accept mail for (blank for none) : 172.16.1.0/26 (<- tambahan baris terakhir)
Force synchronous updates on mail queue : No
Local networks : 172.16.1.0/26
Use procmail for local delivery : NO
Mailbox size limit (bytes) : 0
Local address extension character : +
Internet protocols to use : ipv4
10) pico /etc/postfix/main.cf
inet_interfaces = all
inet_protocols = ipv4
home_mailbox = Maildir/
* Jangan ubah / hapus baris lainnya.
11) /etc/init.d/postfix restart
Stopping Postfix Mail Transport Agent : postfix.
Starting Postfix Mail Transport Agent : postfix.
12) /etc/init.d/courier-imap restart
Stopping Courier IMAP server : imapd.
Starting Courier IMAP server : imapd.
14) /etc/init.d/courier-pop restart
Stopping Courier POP3 server : pop3d.
Starting Courier POP3 server : pop3d.
15) Buka Browser PC client anda. Masukkan url "http://mail.situstkj.co.cc" Setelah itu silahkan email2an Jika berhasil maka konfigurasi WebMailserver anda sukses.
|
Setelah MengKonfigurasi
WebMail Server, Sekarang kita akan belajar mengkonfigurasi FTP Server. Hanya diperlukan beberapa Langkah untuk mengkonfigurasi FTB server tersebut.
*Kata2 bercetak tebal adalah perintah yang harus dijalankan.
*Kata2 berwarna merah adalah perubahan/sesuatu yang harus anda buat.
1) apt-get install proftpd
Run proftpd : standalone
2) pico /etc/proftpd/proftpd.conf
# Includes DSO modules
Include /etc/proftpd/modules.conf
# Set off to disable IPv6 support which is annoying on IPv4 only boxes.
UseIPv6 off
# If set on you can experience a longer connection delay in many cases.
IdentLookups off
ServerName "antoro.situstkj.co.cc"
ServerType standalone
DeferWelcome off
3) /etc/init.d/proftpd restart
Stopping ftp server: proftpd.
Starting ftp server: proftpd.
4) Buka browser komputer client dan buka url ftp://www.situstkj.co.cc anda akan melihat tampilan ini:
Anda bisa login menggunakan username antok, ataupun username anisa, yang sudah anda buat pada saat
konfigurasi mail server tadi.
|
Setelah MengKonfigurasi
FTP Server, Sekarang kita akan belajar mengkonfigurasi Proxy Server. Menurut saya ini adalah konfigurasi yang sangat membutuhkan ketelitian. So, Becarefull with your step..!
*Kata2
bercetak tebal adalah perintah yang harus dijalankan.
*Kata2
berwarna merah adalah perubahan/sesuatu yang harus anda buat.
1)
apt-get install squid
2)
rm /etc/squid/squid.conf
3)
pico /etc/squid/squid.conf
acl all src all
acl localnet src 172.16.1.0/26
acl situs url_regex -i "/etc/squid/blokir.txt"
http_access deny situs
http_access allow localnet
http_access allow all
http_port 3128 transparent
cache_mem 8 mb
memory_replacement_policy heap GDSF
cache_replacement_policy heap LFUDA
store_dir_select_algorithm round-robin
cache_dir aufs /cache 10000 24 256
cache_store_log none
cache_access_log /var/log/squid/access.log
cache_effective_user proxy
cache_effective_group proxy
visible_hostname proxy.situstkj.co.cc
3) pico /etc/squid/blokir.txt
sub.situstkj.co.cc
4) mkdir /cache
5) chown –R proxy:proxy /etc/squid/blokir.txt
6) chown –R proxy:proxy /cache
7) /etc/init.d/squid stop
8) squid –z
2010/10/16 19:43:30| Creating Swap Directories
9) /etc/init.d/squid start
10) pico /etc/rc.local
iptables -A PREROUTING -t nat -p tcp --dport 80 -j REDIRECT --to-port 3128
#exit 0
11) /etc/init.d/squid restart
Restarting Squid HTTP proxy: squid Waiting.....................done.
12) Buka browser komp client dan buka http://sub.situstkj.co.cc anda akan melihat tampilan ini:
12) tail -f /var/log/squid/access.log
1287233395.322 6 172.16.1.2 TCP_DENIED/403 1454 GET http://sub.situstkj.co.cc/ - NONE/- text/html * (ini adalah log dari website yang diakses oleh client)
|
Sebelumnya, selamat bagi anda yang telah berhasil Mengkonfigurasi
Proxy Server. Langkah terakhir yang akan kita lakukan adalah mengkonfigurasi DHCP Server.. Silahkan ikuti langkah berikut:
* Kata2 yang
bercetak tebal adalah perintah yang dijalankan pada komputer server.
* Kata2 yang
berwarna merah adalah yang harus anda ubah atau buat.
1)
apt-get install dhcp3-server
Non-authoritative version of DHCP server OK
2)
pico /etc/dhcp3/dhcpd.conf
# option definitions common to all supported networks...
option domain-name "
situstkj.co.cc";
option domain-name-servers
antoro.situstkj.co.cc;
# If this DHCP server is the official DHCP server for the local
# network, the authoritative directive should be uncommented.
authoritative;
# A slightly different configuration for an internal subnet.
subnet 172.16.1.0 netmask 255.255.255.192 {
range 172.16.1.2 172.16.10.61;
option domain-name-servers 172.16.1.62;
option domain-name "situstkj.co.cc";
option routers 172.16.1.0;
option broadcast-address 172.16.1.63;
default-lease-time 600;
max-lease-time 7200;
}
* Untuk kata yang tidak saya cantumkan, jangan diubah/dihapus.
3) Reboot
4) Sambil menunggu komputer server hidup kembali. Ubah settingan TCP/IP di client windows menjadi:

5) Kemudian ping dari komp windows ke komp server.
C:\Users\antoro>ping 172.16.1.62
Pinging 172.16.1.62 with 32 bytes of data:
Reply from 172.16.1.62: bytes=32 time<1ms TTL=64
Reply from 172.16.1.62: bytes=32 time<1ms TTL=64
Reply from 172.16.1.62: bytes=32 time<1ms TTL=64
Reply from 172.16.1.62: bytes=32 time=1ms TTL=64
Ping statistics for 172.16.1.62:
Packets: Sent = 4, Received = 4, Lost = 0 (0% loss),
Approximate round trip times in milli-seconds:
Minimum = 0ms, Maximum = 1ms, Average = 0ms
C:\Users\antoro>ping 192.168.1.1
Pinging 192.168.1.1 with 32 bytes of data:
Reply from 192.168.1.1: bytes=32 time=1ms TTL=64
Reply from 192.168.1.1: bytes=32 time<1ms TTL=64
Reply from 192.168.1.1: bytes=32 time<1ms TTL=64
Reply from 192.168.1.1: bytes=32 time<1ms TTL=64
Ping statistics for 192.168.1.1:
Packets: Sent = 4, Received = 4, Lost = 0 (0% loss),
Approximate round trip times in milli-seconds:
Minimum = 0ms, Maximum = 1ms, Average = 0ms
6) Check mulai dari DNS, Web, Mail, Ftp, Proxy. Jika bisa, berarti konfigurasi anda berhasil.
|